Tuesday, March 15, 2011

FO: Zig Zag Cowl

Zig Zag Cowl

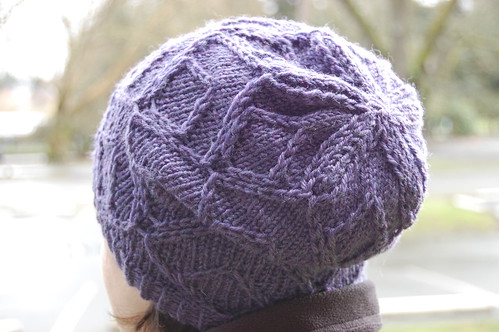
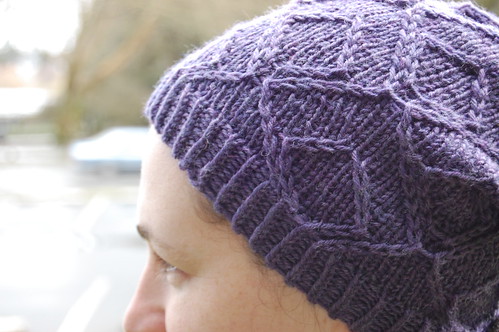
Yarn: Lion Brand Wool-Ease
Needle: US8
Pattern: Improvised (rav project page)

Zig Zag Cowl

To make it, I used Cat Bordhi's video on mobius cast-on (on youtube). I cast on 180 stitches in this manner, knit one round as instructed in the video, then proceeded to knit in the same pattern as the hat:

Round 1, 3, 5: *K1, M1L, K9, K2tog, SSK, K9, M1R, K1*
Round 2, 4: Knit all
Round 6, 7, 8: Purl all

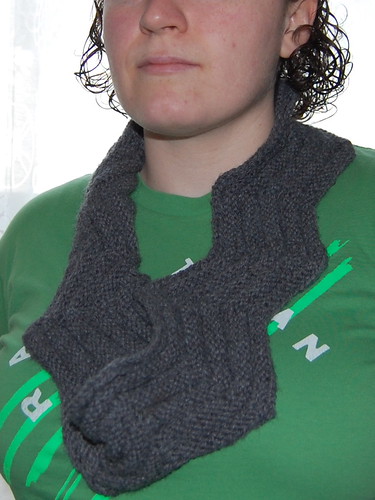
I repeated these 8 rounds twice, then did Rounds 1 and 2 and cast-off with a super stretchy cast off (youtube video). Because of the nature of mobius knitting, the rounds are really long (360 stitches), so in that way it seems a bit of a slog-fest, but this project actually went pretty quickly, knit up in probably less than 4 hours.

Cat Bordhi recommends a long needle (40-something inches) but I only had a 36" size 8, so I made it work, but it was a challenge, and if I make one of these again, I'll get the longer needle for sure. I also wish I had done another set of 8 rounds before casting off--because of this pattern, the cowl condenses laterally quite a bit. This will provide extra warmth, but I would have liked it a bit taller. I'm really not a huge fan of this yarn, though, so I was itching to cast off ASAP. I also wouldn't have minded if it was a bit longer. If I ever make this again, I'll add 24 more stitches to the cast on. (Note: To get the pattern to work with the mobius method, you need an odd number of pattern repeats.)

Zig Zag Cowl

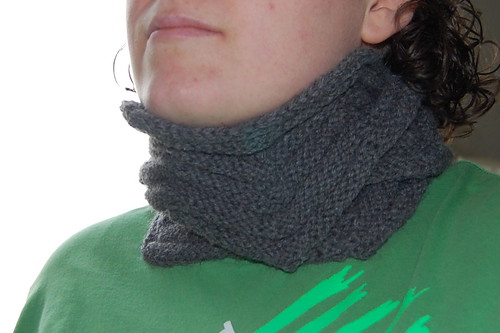
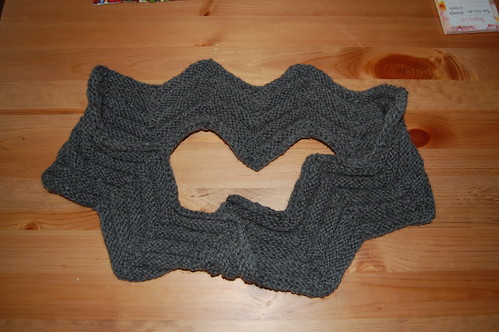
This cowl is intended to match my Copy Cat Hat and I'll be taking them with me to Canada next week. I also plan on making a pair of mittens to go with them, but first I need to finish up the hat I'm making for Raj!

Monday, March 14, 2011

Green Tea Facial Scrub


I really should be menu-planning so that I can go grocery shopping so that I can get to work on tonight's dinner (spinach ricotta pie in honor of Pi Day... hehe). But instead, I just gave myself a little facial. My face has been acting funky for a few days, so I decided it could use some TLC.

To start, I made this nifty little face scrub, cobbled together from a few different recipes.

Ingredients:
  • 3 T sugar, divided
  • 1 T strong green tea*
  • 1 t olive oil
  • 2 drops tea tree oil (optional)
*For the green tea, brew 1 tea bag or 1 teaspoon loose leaf in about a half of a cup of boiling water. Let it cool down until it's only lukewarm.

Put 2 T of sugar in a bowl, pour 1 T of the green tea on top (save the rest for later!), mix together--the sugar might dissolve a bit, that's ok. Then add the third tablespoon of sugar. (Is it important to add the sugar in sections?? I have no idea.) Then I added the teaspoon of olive oil (alternatively, you could add a wee bit of honey). Then I added 2 drops of tea tree oil. Stir stir stir!

Before using a face scrub, it's best to get your pores nice and wide open. I did this via showering. You could also do this by holding a steaming hot washcloth over your face for a few minutes. Apply the face scrub to your face gently with your fingertips or with a cotton pad, then give your face a nice massage with your fingertips. Rinse your face, being certain to remove all the sugar especially around your hairline. (The extra face scrub goes into the fridge and is good for a week or so.)

Next, tone your face with a bit of the left-over green tea. Just pour a bit onto a cotton pad and rub it onto your face.

Lastly, don't forget to moisturize! The moisturizer I used is something I whipped up last night. It's just coconut oil with 3 drops of sweet orange essential oil and 5 drops of tea tree oil mixed into a couple tablespoons of oil. Coconut oil exists in a solid state at room temperature, so before mixing in the oils, I microwaved it for less than a minute to get it liquid. Mixed in the essential oils and put it aside. By morning, it was solid again. To use, just rub two finger tips into the solid oil to loosen a bit, then rub this onto your face. NOTE: a little goes a long way with coconut oil, so apply sparingly, my friends.

Et, voila! My awesome facial! And now, back to menu planning.

Friday, March 11, 2011

FO: Potholders for swapping!

Crochet Potholders (Fronts)

Pattern: Ripple Potholder
Yarn: Plymouth Yarn Fantasy Naturale (cotton, mercerized)
Hook: G (4mm)

Tada! My potholders for the Potholder Swap. Above, the fronts; below, the backs.

Crochet Potholders (Backs)

These were great fun to make. I'm glad that I did my practice ones--got my crochet muscles toned before jumping in for these. Prior to hooking, I did a bit of planning for the colors of each potholder.

Crochet Potholder Planning

As I was crocheting along, the potholders ended up too big, so I omitted the final round before the border, so the color schemes were slightly altered from my plan. But I'm still happy with the result.

Potholder #1 Potholder #2 Potholder #3 Potholder #4 Potholder #5

From left to right, potholders 1-5. Crocheting potholders is a great way to play with color, something I'm a bit timid at. And while I was planning these, I did tons of browsing at all sorts of crochet projects and I'm already visualizing my future crochet projects.

New wall decor


That's right. I fell in love at Ikea on Wednesday.

With this fabric:

3.10

From the moment I spotted it in the disorganized mess that is the fabric section at Ikea, it was as though I had been gripped by a powerful magnet. The buy-this-now magnet. In an exercise of extreme self-restraint, I only got a yard and a half. The main purpose of the fabric was as decoration above the fireplace, and the rest has been stashed away for a later date.

New wall decor

I mounted the fabric on a frame that I got from an art supply store; it was less than $7. You buy the frame in pieces, so you can totally customize it to whatever size you want. Mine is 30"x36".

Mounted fabric

The fabric is attached with a staple gun. There are lots of tutorials on youtube for how to do this. I'm particularly happy with my corners on this one. I used a professionally mounted canvas we have as a model.

Mounted fabric corner

This fabric is just one of the many awesome things I got on this most recent trip to Ikea. Midday on a Wednesday is a great time to shop there, lemme tell 'ya!

Butters and the Ikea bag

Butters also loves Ikea products. More specifically, the bag. Weird cat.

3.11

On a completely unrelated note: there's a cherry tree blossoming outside my kitchen window and each of the past two days I've seen a hummingbird flitting around out there. Yea.

Tuesday, March 8, 2011

Practice Potholders

I decided that this year I would participate in the Potholder Swap. My crochet is definitely rusty, so I did a handful of practice potholders to loosen up. All the yarn is Sugar n' Cream cotton that was in my stash (yes, the colors are garish). I used a size G4 hook.

Crochet Potholder
Pattern: Grape Cluster Potholder

Crochet Potholder
Pattern: Circle Potholder

Crochet Potholder
Pattern: Your Nana's Potholders

Wheel Potholder
Pattern: Modern Vintage Potholder

Hexagon Potholder
Pattern: Improvised

These were fun, and a good lead up to my swap potholders, which are coming up next!

FO: Gespeg Hat

Gespeg Hat

Pattern: Gespeg (my Rav project page)
Yarn: Cascade 220 Superwash
Needle: US 8

I knit this hat as a test-knit--my very first test-knit experience! I've admired Ariane's designs for a bit, and so I jumped at the opportunity to test knit her newest hat.

Gespeg Hat

The yarn is from the stash, leftover from this little sweater. Yea for using stash yarn.

I put a bunch of notes up on Ravelry about this project, but to summarize: Great pattern; love the crown shaping; a bit too slouchy for my taste.